A tool is one request to your API, described well enough for an agent to use it: look up a repair, create an order. An MCP server brings its own tools. An API you connected by its address starts with none, and you make them here.
Copperleaf Bike Works has connected its workshop system as Copperleaf
workshop, at https://workshop.copperleaf.example/api/v1 (see
connect any MCP server or API by its address).
The workshop system holds the repair orders, and the front desk needs one tool
from it: Look up a repair, which reads a ticket. Bookings live in Google
Calendar, which brings its own tools (see connect
Google).
The Tools tab
Open the integration from /integrations and pick Tools:
“Tools let your agents look things up in this system. Open one to edit it.”
There are two ways to add tools:
- Import from OpenAPI: make tools from the API’s own description.
- New tool: build one by hand.
Import from an OpenAPI file
If the API publishes an OpenAPI 3 file, start here. Click Import from OpenAPI:
“Paste, upload or link the API’s OpenAPI 3 file. Choose the operations your agents should use; each becomes a tool you can check and edit.”
Under Where the file comes from, choose Paste, Upload (“JSON or YAML, up to 2 MB.”) or Link, then click Read the file. The import handles “Simple JSON APIs only: operations that upload files, send forms or stream are listed as not supported yet.”
You see every operation, with its method, its path and whether it reads or makes changes, and a count such as “24 operations, 21 can be imported”. Operations that can’t be imported say why: “Not supported yet: it sends a file.” Search with Search operations, or click Select read-only only to tick every lookup at once. You can import up to 100 at a time.
Click Import 2 tools:
“Imported 2 tools. Add them to an agent on the agent’s Integrations tab.”
Each imported tool is an ordinary tool. It starts Not checked yet, and every operation other than GET and HEAD comes in as one that makes changes. Open it to edit any part of it, as below.
| What it says | What to do |
|---|---|
| ”This isn’t an OpenAPI 3 file. A Swagger 2 file can be converted to OpenAPI 3 first.” | Convert the file, then read it again |
| “This file points to other files. Bundle it into one file and try again.” | Bundle it into a single file |
| ”We couldn’t download that link. Check it is a public https:// address.” | Paste or upload the file instead |
| ”This integration has no API address yet, so nothing can be imported. Add the address on the Settings tab, then read the file again.” | Add a Base address on Settings |
Build a tool by hand
Click New tool. The tool opens in a panel on the right.
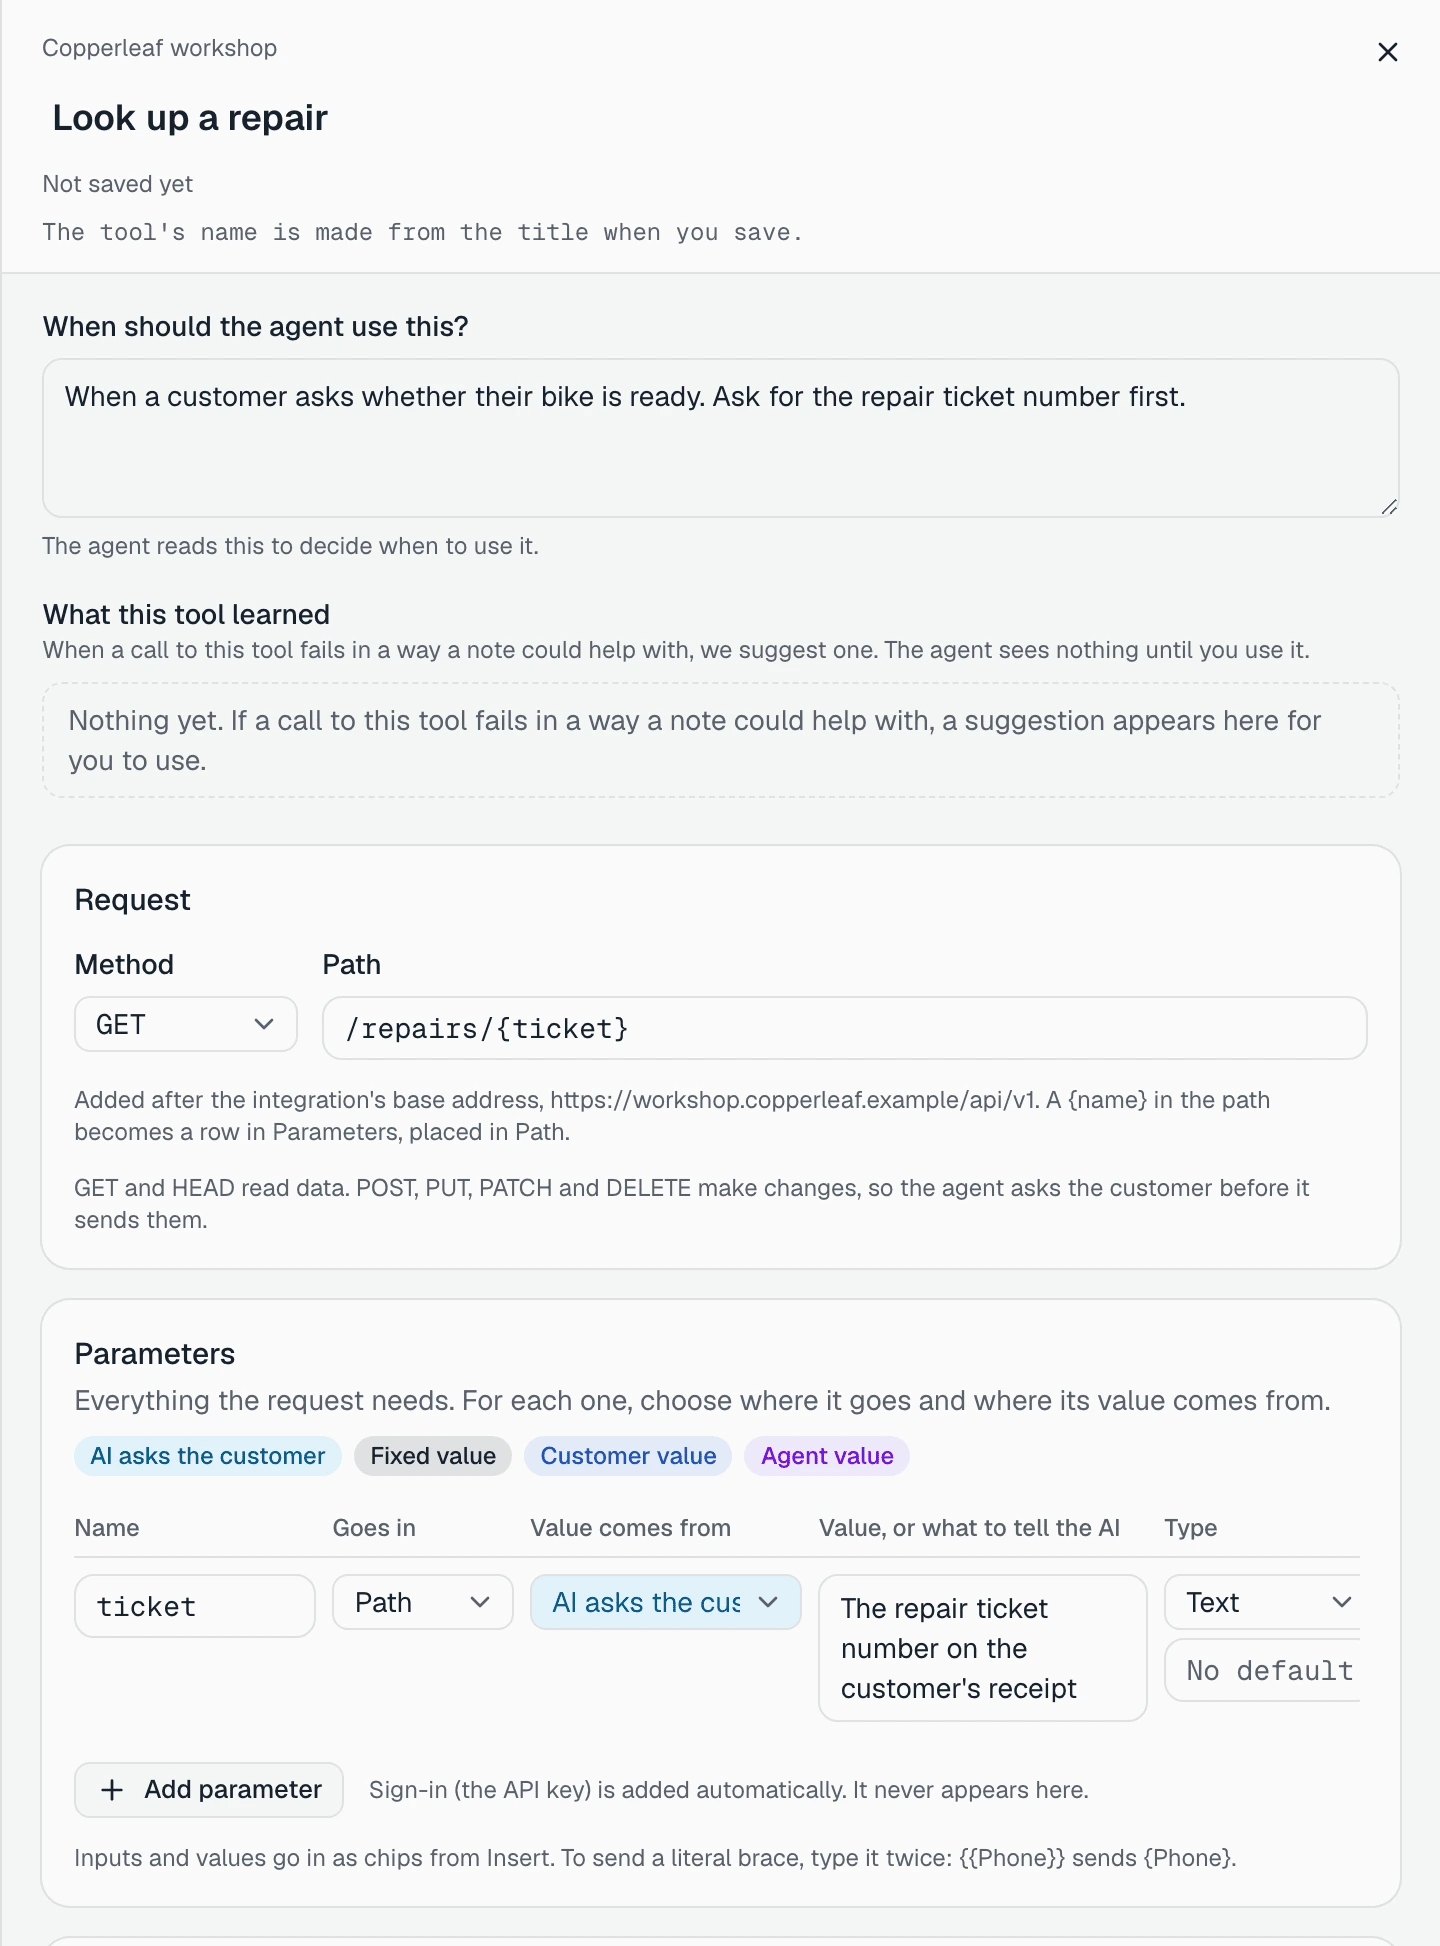
Title is the tool’s name in the app, for example Look up a repair. “The tool’s name is made from the title when you save.”
When should the agent use this? is the most important line on the page: “The agent reads this to decide when to use it.” Say when, and what to ask first. Copperleaf writes: When a customer asks whether their bike is ready. Ask for the repair ticket number first.
The request
Under Request, choose the Method and type the Path. The path is “Added after the integration’s base address, https://workshop.copperleaf.example/api/v1.”
“GET and HEAD read data. POST, PUT, PATCH and DELETE make changes, so the agent asks the customer before it sends them.”
Look up a repair is GET with the path /repairs/{ticket}. A name in curly
braces in the path becomes a row in Parameters, placed in Path.
Parameters: where each value comes from
Parameters lists “Everything the request needs. For each one, choose where it goes and where its value comes from.” Click Add parameter for each one.
Goes in is Path, Query, Header or Body. Value comes from decides who fills it:
| Value comes from | Who fills it | Example |
|---|---|---|
| AI asks the customer | The agent, from the conversation. In Value, or what to tell the AI, say what to ask for | ticket: The repair ticket number on the customer’s receipt |
| Fixed value | You, once. It is sent the same every time | shop: main |
| Customer value | Our server, from the conversation. The agent can’t change it | The customer’s phone number |
| Agent value | Each agent, on its own Integrations tab | Which shop this agent works for: shop_id |
For AI asks the customer, also choose the Type (Text, Number, Whole number, Yes or no, One of… or List of…) and whether it is Required.
Customer value can be Customer’s phone, Customer’s email, Contact record, Conversation, Agent, Channel or Current time.
An Agent value lets one tool serve agents that need different values. Each agent fills it in on its Integrations tab, as in give an agent tools from your other systems.
You never add the key here: “Sign-in (the API key) is added automatically. It never appears here.” Type something that looks like a key into a value and the panel warns you: “This looks like a key or password. Keys go on the Authentication tab, and sign-in is added automatically. Saving will refuse it.”
What gets sent, and what the AI sees
What gets sent shows the full request as it will go out: the address, the headers, with “Authorization (added automatically)”, and the body built from the rows placed in Body. For an API that needs an unusual body shape, Advanced: write the body as JSON yourself replaces the Body rows with JSON you write.
What the AI sees is the other half:
“The AI gets only this: the tool’s name, when to use it, and the inputs. A ? marks an input it may leave out.”
“The address, customer values, agent values and key are added by our server. The AI never sees them.”
Customers see only their own records
Make sure customers only see their own records lists the customer values the request can use, and how far each one can be trusted:
- “WhatsApp, SMS and outbound calls: verified by the phone network or the channel.”
- “Email: verified by the channel.”
- “Website chat: from the chat form, not verified.”
“On inbound calls, the caller’s number is not verified. For private records, also ask for something only they know, and make that input required.”
Reads data, or makes changes
Under Safety and availability, What it does is Reads data or Makes changes. The method decides the minimum: a POST tool says “POST requests count as making changes.” and can’t be set to read.
A GET tool reads by default: “The agent uses it without asking the customer first. If this request changes anything, choose Makes changes.” A GET that still changes something, for example one that marks a ticket as seen, should be raised. Click Makes changes, and a dialog asks “Treat this tool as making changes?”:
“Only do this if the request changes something in Copperleaf workshop. Once you save, it can’t go back to Reads data, and your name and the time are saved with this choice.”
Click Treat as makes changes. There is no way back once saved: “This tool is set to make changes. That can’t be undone.”
A tool that makes changes gets a Confirmation:
“The agent reads these details back to the customer in the customer’s language and only goes ahead after the customer says yes.”
How that looks on each channel is in changes the customer confirms.
Use on is Messages, Calls, or both. On calls, a lookup “waits at most 8 seconds”, and for a change “the agent reads the details back and the caller says yes before anything changes.”
The last part of the section is what the customer sees while the tool runs. Before the result, the agent may send one short line of its own. On website chat, you can also set the Website chat status text for While running, Done and Failed, such as Checking your repair…. “Left empty, website chat shows “Working on it…”, “Done” or “Couldn’t complete” in the chat’s language.”
Choose which fields of the answer to keep
An API often answers with far more than the agent needs: internal IDs, audit fields, the whole parts list. What the agent receives keeps only what you tick:
“Tick the fields the agent needs. Nothing ticked: it receives the whole answer.”
The fields come from a real answer, so run a check first (below): “Run a check
to choose fields.” After a check passes, you see the answer as a tree. Tick
status, ready_date and notes, and the line above the tree says
Keeping: with those three. Keep everything clears the choice. “A tool
keeps up to 50 fields.”
For a tool that makes changes, the field list appears after you use Run for real once.
Character limit caps the answer: “Up to 8,000 characters. Longer answers are cut, last items first.” The preview says how big the kept answer is: “The agent would receive 212 of up to 8,000 characters:”.
Check it
Check it is optional. A tool you save works for agents whether or not you checked it. A check tells you, before a customer finds out, that the request is right.
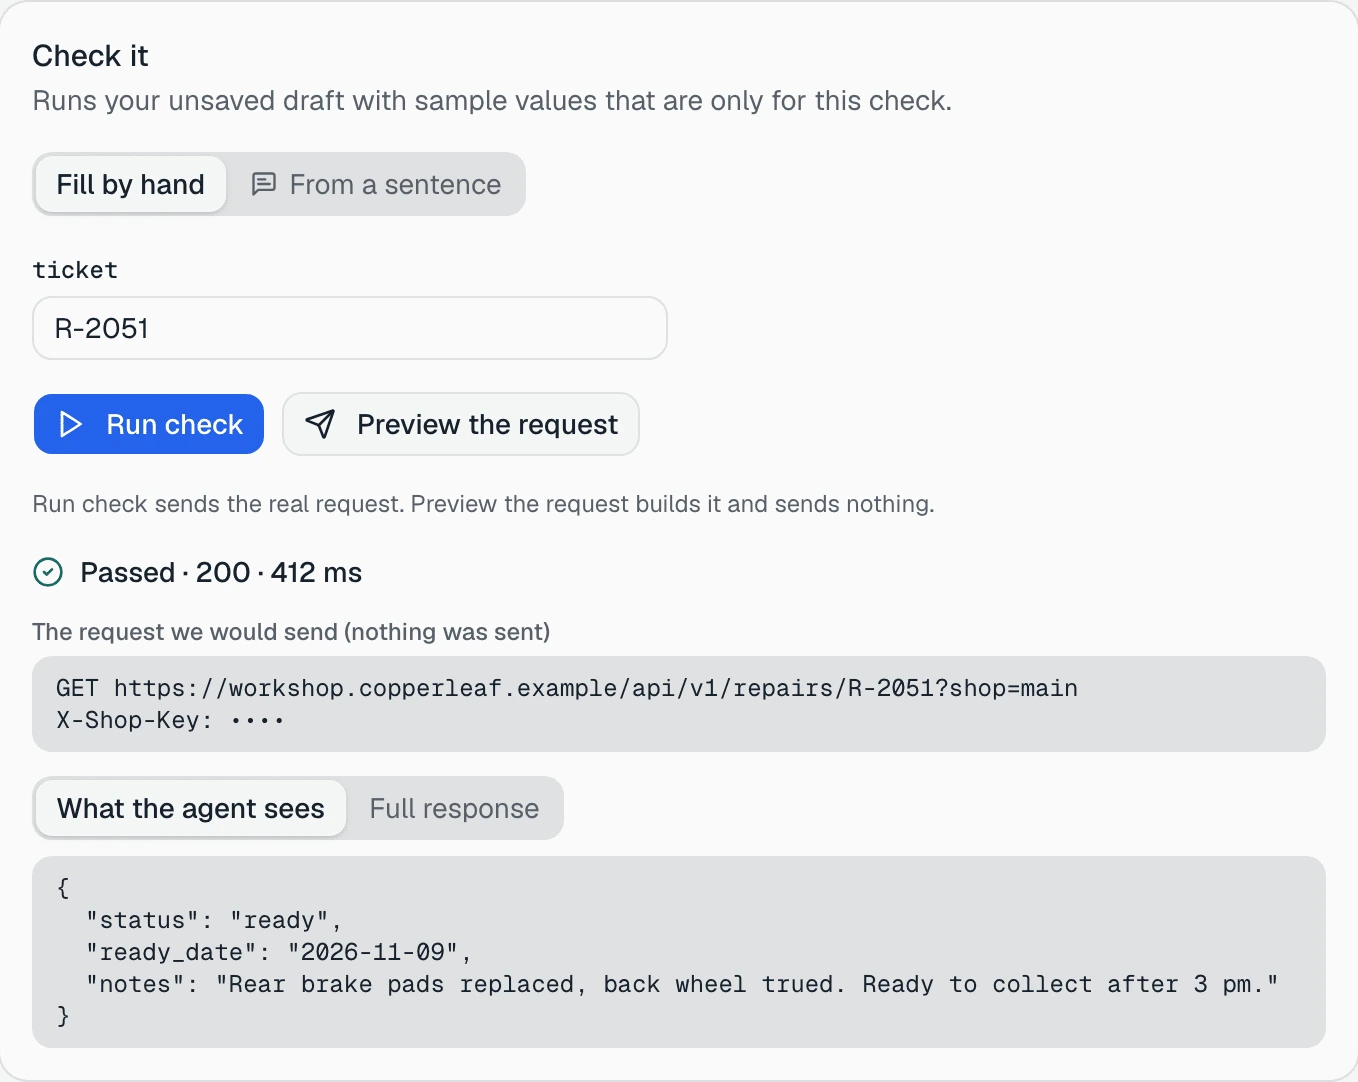
“Runs your unsaved draft with sample values that are only for this check.”
Sample values
Every input the AI asks for gets a Sample value: box. You can type them (Fill by hand), or choose From a sentence, type what a customer might write, and click Fill in:
“We read the values from the sentence with the AI (a small amount of AI usage each time). Nothing is sent to the API, and you can change them before you check.”
If the request uses a customer value, the check asks for a sample one, such as Customer’s phone. If it uses an agent value, choose the agent under Agent values from: “The check uses this agent’s values and the account it uses.”
A tool that reads data
| Button | What it does |
|---|---|
| Run check | Sends the real request |
| Preview the request | Builds it and sends nothing |
A tool that makes changes
| Button | What it does |
|---|---|
| Check the request | Builds it and sends nothing. “that’s enough to save the check.” |
| Run for real | Really sends it once, after you confirm |
Run for real asks first:
“Really send this change? This really sends POST /orders to the other system, once, with your sample values. It isn’t a test there: undo it afterwards if you need to.”
Click Send it, or Cancel. For a DELETE, the question is “Really delete?” and the button is Delete it. Afterwards the panel reminds you: “That change really happened in the other system. Remember to undo it there if it was only a test.” Run it against a test record, and undo it there afterwards.
The result
While it runs you see “Checking… 3 s” and Stop waiting. Then one of:
- Passed with the status and time, such as “Passed · 200 · 412 ms”. Two tabs show What the agent sees and the Full response.
- “Checked, not run. Nothing was sent.”, with “The request we would send (nothing was sent)”. A tool that makes changes also shows the sentence the agent will read back to the customer.
- Check failed with the status, a hint, and what the API said.
| Hint | What to do |
|---|---|
| ”The API refused the key. Check the key on the Authentication tab.” | Replace or check the key |
| ”The API couldn’t find it. Check the path, or try a value that exists.” | Fix the path, or use a real ticket number |
| ”The API refused the request. Check the sample values and the request.” | Compare the request with the API’s documentation |
| ”The API had a problem on its side. Try again in a minute.” | Try again later |
| ”The API took too long to answer.” | Try again, or ask the API’s owner |
| ”We can’t reach this address from our servers.” | Check the integration’s address |
| ”The request uses Agent: shop_id. Choose an agent that has it under Agent values from.” | Pick an agent that has that value |
What the tool’s label says
The tool’s card on the Tools tab, and the top of its panel, show where its check stands:
| Label | Meaning |
|---|---|
| Not checked yet | No check has run |
| Previewed, not run | A tool that reads data was only previewed |
| Checked, not run | A tool that makes changes passed Check the request |
| Checked | A real request passed, with its date |
| Edited since the check | You changed it after the check |
| Last check failed | The last check didn’t pass |
Save
Click Save. If the tool has no passed check, the “Saved.” message offers Check it, which you can ignore. The footer lists what you changed since the last check, such as “Changed since the check: the request”.
“To use this tool, add it on an agent’s Integrations tab.”
A saved tool also has a History tab with its versions. From the Tools tab, the tool’s ⋯ menu has Duplicate (“The copy starts unchecked.”), for a second tool that differs from the first in only a few values.
Next, give the tools to an agent and test them safely before customers reach it.